
Adobe Premiere Pro CC is a professional and sophisticated editing software application that enjoys world-wide reputation for its versatile features: track motion, multi-camera editing, audio mixing console and so forth. It can import and edit audios and videos encoded in various formats, but when you try to import MKV video files into it to do some modifications, It is very likely that Sony Vegas Pro fails to open the MKV files. Sony Vegas Pro excludes MKV from its supported format range due to MKV's complicated and flexible codec. If that's the case, you have to convert MKV to something (using a different codec) that Sony Vegas Pro can edit successfully.
The Panasonic Lumix S1 can continuously shoot at up to 9 frames per second in AF-S mode and record with a buffer of 90 photos in RAW, and 70 photos in RAW+JPEG. In JPEG only, Panasonic rates the buffer to handle 999 photos or more. In AF-C mode, the S1’s frames-per-second rate drops to 6 per second. Thanks to its outstanding features of recording 4K video in .mp4 format. If you opt for the additional video upgrade, the S1 becomes a much more formidable video capture device. In addition to gaining the Like2100 and V-Log video profiles, the S1 will also be able to record 4:2:2 10-bit video internally without any pixel binning in 30p/25p/24p. The S1 can also capture 4K 60p/50p 4:2:2 10-bit via HDMI out. Internal 4Kp60 capture is written in 4:2:0 8-bit.
Import 4K files from Panasonic Lumix S1 to Premiere Pro CC
However, after recording such Ultra HD footage, many folks are reported to run across various problems when importing and editing Lumix S1 4K HEVC clips in Premiere Pro CC. What’s the matter? Read on to learn some tips and tricks for smooth workflow of editing Panasonic Lumix S1 4K H.265 footage in Premiere Pro CC.In this article, we'll show you how you can create a video conversion process from your MKV files, into a more edit-friendly format. The end result, you can import the your stuff into Sony Vegas Pro without any problems.
In general, as far as I know, working with 4K files can be taxing on your computer, especially if you don’t have the most powerful machine to edit on. And from our tests it looks like Premiere Pro CC has to create a lower resolution proxy file to display in the NLE while you’re editing. It would be a complex and time-consuming process. On this case, in order to seek for a better workflow of editing Lumix S1 H.265 videos with Premiere Pro CC, the optimal workaround is to transcode the footage into a more editing-friendly format in 1080P for Premiere Pro CC, which will save you both time and trouble, and all you need is to drag the result videos for prompt editing.
To finish the 4K H.265 video to Premiere Pro CC supported video format converiosn task perfectly, here I highly recommended you adopt the professional yet easy-to-use Acrok Video Converter Ultimate. It is the solid tool to help users to transcode 4K video files like 4K MP4, MOV, MXF, etc to any format you want. It offers the optimal preset profiles for Premiere Pro CC, Sony Vegas Pro 17, Avid Media Composer, Lightworks, DaVinci Resolve 16, Pinnacle Studio and more. And there is no need to worry about the quality loss. Just download it and follow a simple tutorial below to import Lumix S1 HEVC video into Premiere Pro CC for editing smoothly.
Free download Lumix S1 to Premiere Pro CC Converter


Converting 4K HEVC from Lumix S1 to work in Premiere Pro CC
Step 1: Run the H.265 to Premiere Pro CC Converter you just set up. Drag and drop the 4K HEVC files to the software. You can also hit Add files button to import videos to the app.
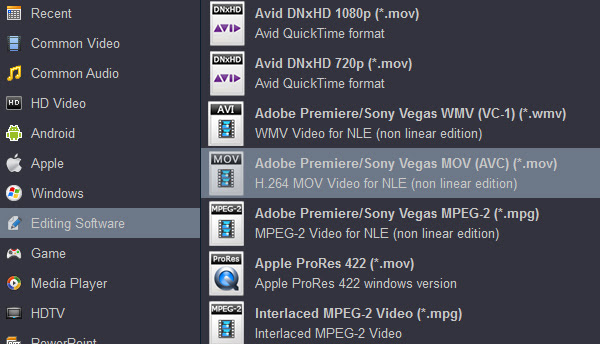
Step 2: Click on the Format box to get the dropdown menu. Follow "Editing Software" > "Adobe Premiere AVC(*.mov)” as output format.
Step 3: Adjust video and audio parameters, including the Bitrate of Video and Audio, the Codec of Video and Audio, Video Size, Sample Rate, Frame Rate, Audio Channels, etc., in the Profile Settings to get 4K files converted for working with Premiere Pro CC smoothly. You’d better adjust original 4K video to HD quality.
Step 4: Click the Convert button to start transcoding Lumix S1 4K HEVC files for Premiere Pro CC. After the process completes, click “Open” button to find the generated videos, and then you can transfer and edit the Lumix S1 4K HEVC video in Premiere Pro CC easily and quickly.
You may also like:
How to spy on iPhone 13 Pro Max
How to play Blu-ray movies on Galaxy S22 Ultra
Best Hidden Spy App for Android - 2022
Edit Lumix GH6 H.265 MOV in DaVinci Resolve
How to edit Blu-ray in Avid Media Composer
No comments:
Post a Comment